


)
)
Remote desktop connections are a valuable tool for IT professionals and businesses. They allow secure access to computers and servers from remote locations. This can serve companies in a whole range of situations, including what we have as today’s focus: remote support and screen control tasks. Before remote access recently became a basic necessity, one of the initial reasons using RDP became common was for screen control and remote support. First, here's a step-by-step guide on how to allow remote desktop connection. Once you have enabled this feature native to Windows-based systems, next, you can choose to leverage TSplus Remote Support so that those remote connections can be the lifeline of the host computers you will access.
TSplus Remote Support Free Trial
Cost-effective Attended and Unattended Remote Assistance from/to macOS and Windows PCs.
Allowing Remote Desktop Connections
Step 1: Ensure Remote Desktop is Enabled:
- Open System Properties: Right-click "This PC" (or "My Computer" in older Windows versions). Then, select "Properties."
- Access Remote Settings: In the System window, in the left-hand menu, click on "Remote settings". You need administrative privileges for this step.
- Enable Remote Desktop: In the Remote tab of the System Properties window, check the box labelled "Allow remote connections to this computer."
NB: You may select the option to allow connections from any version of Remote Desktop, or you can choose to allow connections only from computers running Remote Desktop with Network Level Authentication (more secure).
Step 2: Configure Firewall and Network Settings
- Adjust Firewall Settings: Make sure your firewall isn't blocking Remote Desktop. You may need to add an exception for "Remote Desktop" or "mstsc.exe" (the Remote Desktop client).
- Check Network Connectivity: Ensure that your computer is connected to the network or the internet, as remote connections require a network connection.
Step 3: Grant User Access
- Select Users: To allow specific users to connect remotely, click the "Select Users" button in the Remote tab.
- Add Users: In the Remote Desktop Users window, click "Add" and enter the names of the users who should have remote access. Click "OK" when finished.
Step 4: Connect Remotely to Remote Desktops
- Find Your Computer's IP Address: You'll need your computer's IP address to connect remotely. One way you can find it is by searching for "cmd" in the Start menu, opening Command Prompt and typing "ipconfig".
- Remote Desktop Connection: On the remote computer, open the Remote Desktop client (usually "mstsc.exe").
- Enter IP Address: In the Remote Desktop client, enter the IP address or hostname of the computer to which you want to connect.
- Login: You'll be prompted to enter the username and password of the remote computer. Once entered, click "Connect".
- Enjoy Remote Access: You should now be connected to the remote computer's desktop.
Step 5: Now You have Allowed Remote Desktop Connection, Secure Your Connection
- Use Strong Passwords: Ensure that both the local and remote computers have strong, unique passwords.
- Enable Network Level Authentication (NLA): If possible, enable NLA for an extra layer of security.
- Remember to follow best practice for security, such as keeping your operating system and software updated. You can also consider using other security measures if necessary, such as a VPN, or, even better, TSplus Advanced Security.
How to Use TSplus Remote Support to Allow Remote Desktop Connections
Following these steps will allow remote desktop connections to your Windows computer or server, enabling efficient IT management and support, just as TSplus offers a simplified and secure alternative for remote access and control.
TSplus Remote Support is a robust cloud-based software designed to provide attended and unattended remote assistance to clients. Here's a concise guide on how to make the most of this powerful tool.
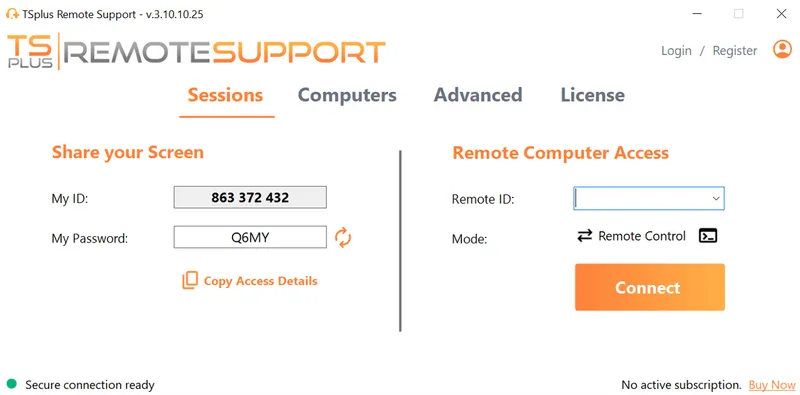
Step 1: Access TSplus Remote Support, With or Without an Account!
- Choose: The first thing to do is to choose between expert or lite download. Are you an agent? Expert. Are you a general user requiring support? Lite.
- Download: Download and install our software. From our website, this is done in a few clicks. The download should be rapid too since TSplus Remote Support is relatively light.
- Login: If you don't want an account yet, it is possible to provide support without. Still, should you want to organise your computers, track session times and customise the console your clients will download, then sign up on the TSplus website. As an agent with an account, log in to TSplus Remote Support using your credentials.
Dashboard: Once all set, you will be greeted by our user-friendly administration console, which is the central hub for all your remote support activities.
Step 2: Initiating Remote Assistance: Host or Agent Invites
- Invite the Agent: As a host, you can invite an agent to assist your device remotely in one click on your console. They will then need your ID and the onetime password that appears on your screen.
- Launch a Support Session for a Saved Computer: To assist a remote client, agents can also initiate a support session. You can do this from the TSplus Remote Support dashboard, in the tab entitled “computers”. To save devices, remember you need to register and log in.
As you can see, for agents and hosts alike, TSplus provides easy ways to invite the other party to invite others and to launch or to join a session.
NB: Unattended support can be enabled per device, as well as Wake-on-LAN.
Step 3: Get to Work!
Done. Provide your teams with the right tool for the job with TSplus Remote Support, enhancing your IT support capabilities. By following these steps, you can provide efficient and secure remote assistance to your clients in an instant. With the ball in their hand to invite your agents, you can keep on building trust with them and answer their call at the drop of a hat.
TSplus Simplicity - Remote Assistance Features
- Unattended Sessions and Wake-on-LAN: TSplus Remote Support supports these two essential time-saving and planning nuggets, enabling your teams to work without impeding each other and at any time.
- Screen Sharing: Our software allows you to view and control the host desktop in real-time. This feature is invaluable for troubleshooting and providing immediate assistance as well as for collaboration.
- File Transfer: Seamlessly transfer files between your computer and your client's machine during the support session. This is particularly useful for sharing patches, updates or important documents.
- Chat Functionality: Communicate with the client through built-in chat, ensuring clear and instant communication throughout the session.
- Session Recording: TSplus offers the option to record support sessions for documentation and training purposes.
Session Management Features of TSplus Remote Support
Below, let us highlight the session management features of our affordable Citrix alternative.
- Multiple Sessions: Manage multiple support sessions simultaneously, making it easy to assist several clients efficiently
- Multiple Agents: Invite colleagues to work collaboratively to fix an issue or for demonstration purposes on a situation and its resolution.
- Saved Computer Management: Provide organised access to saved computers for easy organisation of large workflows.
- Session Reports: Access session reports to track support activities, making it simple to bill clients or evaluate your team's performance.
TSplus Remote Support - Security and Data Privacy
Last but not least, one of our main concerns as a company: cyber security. Indeed, we are intent on keeping your IT infrastructures and data safe and secure. Here are the security aspects of our SaaS solution.
- Secure Connections: TSplus Remote Support employs robust security measures to ensure that your remote connections are safe and encrypted.
- Data Privacy: Rest assured that your clients' data remains private and protected during support sessions.
- Close in a Click: Any session can be terminated instantly should the need arise, just by closing the window.
Conclusion
Allowing remote support connexions may be crucial but does not have to be tedious. At TSplus we believe in making the process as simple as possible to free you to do your best work. The best way to make sure you have found what you were looking for is to try it for yourself.
With recent new features both in the software and in its administration console, TSplus Remote Support is better than ever. And, if you are eager for some juicy compatibility news, then watch out for the little bit of programming magic our development team have been working on for the past few months.
TSplus Remote Support Free Trial
Cost-effective Attended and Unattended Remote Assistance from/to macOS and Windows PCs.
)
)
)