


)
)
Setting up users into your network involves an important initial step: signing them up. To add a user, you will need to create their user account allowing remote access for their device as well as enabling them access to the server, applications, desktop or anything else they will need to use. Here are the basics of how to create an RDP user for a desktop or server followed by details of the process when you are using TSplus Remote Access as your distant access and app publishing software.
How to Create an RDP User for a Desktop or Server
* Step 1: Create a New User
Creating a user involves modifying local computer preferences.
- You need to access “Local Users and Groups” within local “System Tools”.
- When you open “Users”, you should see a list of existing users (Which would be empty but for the default Administrator account if you are just setting up.).
- There, you are able to right click for a menu where you can click on “New User” and create a username, adding the user’s full name and creating a password.
- Closing the new user window will require clicking “Create”.
- Keep a note of the Username somewhere handy. It is needed in step 2.
* Step 2: Add a User to a Server or Desktop
Once the user exists, you can grant them access to all or parts of a server or PC, for example according to their job, tasks and responsibilities. In order to add user permissions, you need to open the Control Panel. Within Systems and Security, “System” has a submenu called “Allow remote access”.
NB: In case you had any doubt about the Windows versions on the device supporting Remote Desktop Protocol, you would be fixed within System and Security. Indeed, Windows Home editions clearly state it is not available and suggest upgrading to a Professional Edition. RDP is one of the principal aspects specific to Pro versions of Windows.
Click on “Allow remote access” to open the device’s System Properties window and choose the tab “Remote Desktop”. You should see a “Select Users” button which you can click to open the Remote Desktop Users Window. There, click the “Add” button.
This is where you need to enter the Username you gave to the user in the Creation step. The users name will get appended to the location when you press “check names”. You can then click “OK” and it the previous window the new user is now existent. There too, click “OK” to validate.
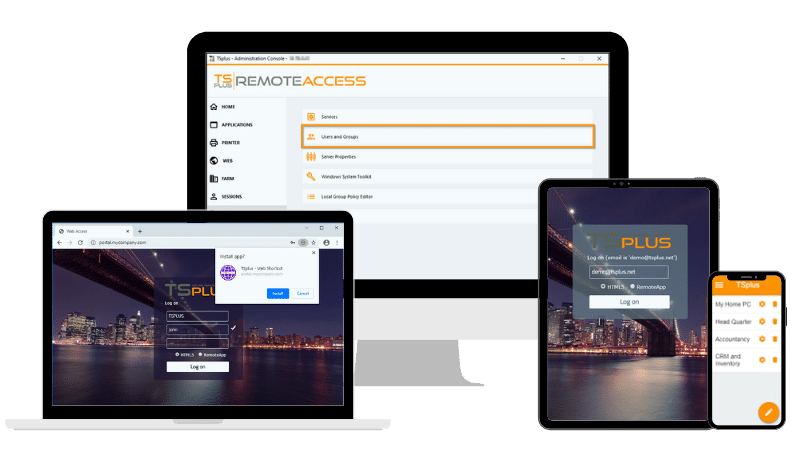
How to Add Users to TSplus Remote Access
Within the ergonomic admin console from which you manage TSplus Remote Access, there are a series of tabs. As for creating users, steps will sound similar to above except they take place with the admin console, in the “System Tools” tab, under “Users and Groups”.
)
The new window that opens is a local users management space where you can add, amend and remove users or groups. Password setting are here too.
)
For more detail about user creation, our Quick-start guide or our user-guide are the best places to look.
Far and Wide With TSplus Remote Access Connections
You have a choice of modes of connection with TSplus Remote Access, according to your setup as well as how your users might need to connect. So, the following step will be to enable the connection and assign either one or more apps or a complete desktop to each user or group of users.
These range from the standard mstsc.exe or the Windows client to a portable TSplus RDP client or even lighter: a HTML5 client over our TSplus Web Portal. The later frees your users to connect on just about any device with an Internet connection and a Web browser.
Assigning Users and Groups to Desktops or Applications
In a few clicks, you have created your new users. Next, you have wide control of what each user and each group will have at their fingertips once they log in. For today's article, assigning desktops to users is the more relevant focus.
Nonetheless, you could assign a single application or any number of apps to a user or to any group you manage. These applications would open seamlessly on the user's desktop as though it were native to their machine. A great way of making memory-heavy applications available on the flimsiest device. Just the same, you could publish an application to any number of servers and deploy it on your network worldwide with a click.
Conclusion on Creating an RDP User for a Desktop or Server
Creating a user is straight-forwards in Tsplus Remote Access. Additionally, our software provides an affordable distant desktops alternative for SMBs and corporate IT. With today's tight budgets and scant time in mind, our teams have designed Remote Access for efficiency and ease-of-use. That's without dwelling on the immense potential for network deployment and upkeep which it makes possible.
Thanks to client feedback as well as to the TSplus staff teams and partners, our tool-set has refined over the years. Also, depending on need, it receives any compatibility or other fixes on a regular to daily basis. And for those looking for heightened security, you might be pleased to hear of our 2FA and Advanced Security and their robust potential for your setup.
On our website, you will find links to find out about each of our products. Together they form a complete suite for secure remote desktop and app publishing tool so you can build your office to be accessible worldwide for your company's purpose. Feel free to contact our sales team or support team with your questions or to click and download right away and test TSplus Remote Access. Indeed, our 15-day fully featured trial is a quick way to find out for yourself if you don't yet know the products or our company.
TSplus Remote Access Free Trial
Ultimate Citrix/RDS alternative for desktop/app access. Secure, cost-effective, on-premises/cloud
)
)
)